Cross-Browser Animated Image Masking (Even in IE) Using polyClip.js
Blog
-
[Linux] 아파치 웹서버 사용자별 웹 디렉토리 설정 –
[Linux] 아파치 웹서버 사용자별 웹 디렉토리 설정– Per-user web directories■ 환경○ OSE : CentOS 7 minimal○ Apache web server : 2.4.6■ 아파치 웹 서버 설정○ 사용자별 웹 디렉토리 사용하도록 설정 : vi /etc/httpd/conf.d/userdir.conf<IfModule mod_userdir.c>UserDir disabled rootUserDir public_html</IfModule><Directory “/home/*/public_html”>AllowOverride FileInfo AuthConfig Limit IndexesOptions MultiViews Indexes SymLinksIfOwnerMatch IncludesNoExecRequire method GET POST OPTIONS</Directory>– root에 대해서는 사용자 웹 디렉토리를 사용하지 않도록 해 보안위협을 예방한다.– Indexes 옵션을 제거해 외부 접속자가 임의의 파일에 접근하는 것을 예방한다.○ PHP 페이지를 위해 웹서버 설정파일에 index.php 추가 : vi /etc/httpd/conf/httpd.conf<IfModule dir_module>DirectoryIndex index.html index.php</IfModule>○ SELinux 설정 : 웹서버가 사용자별 웹 디렉토리에 접근할 수 있도록 권한을 설정한다.– 상태확인 : getsebool httpd_enable_homedirs— 확인결과 : httpd_enable_homedirs –> off– 상태설정 : setsebool -P httpd_enable_homedirs on– 상태확인 : getsebool httpd_enable_homedirs— 확인결과 : httpd_enable_homedirs –> on○ 아파치 웹서버 재시작– systemctl restart httpd■ 사용자별 웹 디렉토리 설정○ 접근권한 설정– mkdir /home/account/public_html– chmod 711 /home/account– chmod 755 /home/account/public_html○ SELinux 설정 : 웹서버가 사용자의 컨텐츠에 대한 접근을 할 수 있도록 설정한다.– 설정 : chcon -R -t httpd_user_content_t /home/account/public_html– 확인 : ls -aldZ /home/account/public_html※ httpd가 httpd_t type으로 실행되며 httpd_user_content_t (typealias), httpd_sys_content_t type으로 설정된 파일만 접근할 수 있다. -
vsftpd Active-Passive mode configuration
Active/Passive 모드 설정
서버에서는 Active 모드, Passive 모드 둘다 지원하도록 기동시켜두고 클라이언트 프로그램에서 이를 선택하도록 한다.
1. Conf 설정
# vi /etc/vsftpd/vsftpd.conf – Passive
pasv_enable=YES pasv_max_port=11000
pasv_min_port=10000
– Active
ㄴ Active모드는 특별한 옵션을 주지 않으면 Default로 동작한다.
2. 재기동
# systemctl restart vsftpd.service 3. SELINUX 설정Conf 파일을 수정하고 재기동 후에, 클라이언트에서 Active모드로 접속했지만 아래와 같은 로그를 보여주고 접속되지 않는다.– Active 모드에 접근할 수 없어서 Passive모드로 접속하겠다는 로그 내용.. 그러나 접속하지 못함.명령: PORT 192,168,0,100,17,9 응답: 200 PORT command successful. Consider using PASV.
명령: LIST
응답: 425 Failed to establish connection.
오류: 디렉터리 목록 조회 실패
SELINUX 때문인데.. SELINUX 로그를 보면 아래와 같은 부분이 남겨져 있다.
… avc: denied { name_connect } for pid=20401 comm=”vsftpd” … – 로그는 설정에 따라 /var/log/audit/audit.log 또는 /var/log/message 에 남겨진다.
– avc는 SELINUX커널에 있는 서비스 – Access Vector Cache
– Active 모드에서 사용하려는 Data세션이 사용하는 포트가 방화벽에 막혔기 때문이라고 한다.
# setsebool -P ftp_home_dir 1 # setsebool –P ftpd_use_passive_mode 1
– setsebool은 SELINUX의 정책을 설정한다.
– P옵션은 영구설정을 의미, 1은 on / 0은 off
– ftp_home_dir 은 ftp서버가 홈디렉토리에만 접근가능하도록 하는 옵션.
– ftpd_use_passive_mode는 ftpd가 Passive모드 사용을 허가하는 옵션.
4. 확인
# getsebool -a | egrep “^ftp_home_dir|^ftpd_use_passive_mode” – getsebool은 SELINUX의 정책을 확인한다.

5. 접속테스트
– Active 모드로 접속.
– 클라이언트에서 정상 접속 후에 21번 포트로 외부에서 접속.

– 파일 다운로드시에 Active모드이므로 20번 포트가 open되어 파일 다운로드
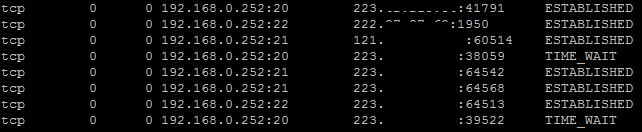
– Passive 모드로 접속.– 파일 다운로드 시에 Passive모드 이므로 Passive모드 사용을 위해 설정해둔 10000~11000 사이의 포트로 Data전송.

-
table index definition document and modeling tools
테이블 정의서 2008인덱스 정의서 2008exerd 모델링데이타 모델링의 이해Download sqljdbc4-2.0.jar[MSSQL]2008 백업 파일을 2005에서 복원하기 -
mssql pivot sample
select * from (SELECT ROW_NUMBER() OVER (ORDER BY [01]) AS [00], left(cast([01] as varchar),7) [99], [01], [02], [03], [04], [05], [06], [07], [08], [09], [10], [11], [12], [13], [14], [15], [16], [17], [18], [19], [20], [21], [22], [23], [24], [25], [26], [27], [28], [29], [30], [31]FROM (SELECT dt+’_’+amst+’_’+pmst+’_’+apst d, DATEPART(d, dt) dd, left(dt,7) wwFROM ( select solardate dt, isnull(cast(am_state as varchar),’0′) amst, isnull(cast(pm_state as varchar),’0′) pmst, isnull(cast(ap_state as varchar),’0′) apst from sldate a left outer join agent_work b on a.solardate = b.work_dateand agent_idx = 1115and (ISNULL(am_state,0)+ ISNULL(pm_state,0) + ISNULL(ap_state,0)) > 0where solardate between convert(varchar(10),Dateadd(m,0,’2015-10-01′),120) and convert(varchar(10),dateadd(ss,-1,Dateadd(m,12,’2015-10-01′)),120)) T) aPIVOT( MIN(d) FOR dd IN( [00], [99], [01], [02], [03], [04], [05], [06], [07], [08], [09], [10], [11], [12], [13], [14], [15], [16], [17], [18], [19], [20], [21], [22], [23], [24], [25], [26], [27], [28], [29], [30], [31]) ) a) tajoin copy_t ct on 1 = 1 and no < 3 -
Smooth Scrolling
Smooth Scrollinghttps://css-tricks.com/snippets/jquery/smooth-scrolling/ -
mock up tools
목업https://moqups.com/http://pencil.evolus.vn/Default.htmlall fromhttp://www.quora.com/What-are-the-best-online-tools-for-storyboarding-a-website -
ORACLE 11G localhost/em
ORACLE 11Ghttps://localhost:1158/em접속Oracle 2014.11.23 14:35오라클 11g를 설치하고.. EM 진입이 안되는 문제가 있었다!어떤 때는 보안 인증서 확인 무시로 하고 들어가면 되었는데…또 어떤 때는 그러한 창이 안나오고 문자가 깨진채 아무런 액션이 없었다 ㅠ(https://localhost:1158/em)문제는… 윈도우 업데이트 중 하나에 있었다….. (역시 막무가내로 업데이트 하면 문제가 많다 ㅠ)요약해서 윈도우 업데이트를 통해 RSA인증서 길이를 제한 했다는 것!(최소 1024bit로 제한… 오라클 EM인증서는 512… ㅠ)제한은 낮춰야 겠지??1. cmd 창 실행2. certutil -setreg chain\minRSAPubKeyBitLength 5123. certutil -setreg chain\EnableWeakSignatureFlags 2이렇게 실행 후 다음 명령어로 확인해 보자!0. certutil -getreg chain아래처럼 뜨면 성공!!—————————————————–EnableWeakSignatureFlags REG_DWORD = 2MinRsaPubKeyBitLength REG_DWORD = 200(512)—————————————————– -
리눅스 centOS 6. root 패스워드 분실로 인한 초기화
http://selene0301.tistory.com/134리눅스 네트워크 설정http://egloos.zum.com/tmt313/v/2557067http://blog.naver.com/seokhok/140110829416ifconfigvi /etc/sysconfig/networkvi /etc/sysconfig/network-scripts/ifcfg-eth0cat /etc/sysconfig/network-scripts/ifcfg-eth0vi /etc/resolv.conf — dns resolv server setting/etc/init.d/network restartservice network restart -
MariaDB install on CENTOS 6.6
MariaDB install on CENTOS 6.6Setting up MariaDB Repositorieshttps://downloads.mariadb.org/mariadb/repositories/#mirror=kaist&distro=CentOS&distro_release=centos6-amd64–centos6&version=10.1installing MariaDB with yumhttps://mariadb.com/kb/en/mariadb/yum/#/etc/yum.repos.d/MariaDB.repoInstalling MariaDB with YUMWith the repo file in place you can now install MariaDB like so:#sudo yum install MariaDB-server MariaDB-client설치중 에러 발생시In our case I have found all packages related to Mariadb with command#rpm -qa | grep -i ‘^MariaDB’And removed them with commands like:#yum remove MariaDB-server#yum remove mysql#yum install MariaDB-server MariaDB-client#service mysql startSet MariaDB to start on boot:# chkconfig mysql onSecure MariaDB after installation# mysql_secure_installation — all yes# service mysql restart# mysql -u root -pInstalling MariaDB 10.0 with YUMhttp://lintut.com/install-mariadb-on-centos/How to Create a New Usermysql>CREATE USER ‘newuser’@’localhost’ IDENTIFIED BY ‘password’;mysql>GRANT ALL PRIVILEGES ON * . * TO ‘newuser’@’localhost’;mysql>FLUSH PRIVILEGES;https://www.digitalocean.com/community/tutorials/how-to-create-a-new-user-and-grant-permissions-in-mysql1. my.cnf 열어서 포트 변경(보통 /etc/my.cnf에 위치한다)2. # service mysqld restart3. iptables에서 자신이 추가한 포트 열기 /etc/sysconfig/iptables 에 아래구문 추가-A INPUT -m state –state NEW -m tcp -p tcp –dport 3306 -j ACCEPT4. iptables 재시작# service iptables restartUpgrade MariaDB 10.0.x to MariaDB 10.1.x on Centos (yum)http://support.qualityunit.com/009608-Upgrade-MariaDB-100x-to-MariaDB-101x-on-Centos-yum